How to Draw a Red Panda A Step-by-Step Manual. When you hear the word “panda,” you probably think of the black and white giant panda bear. Yet, the red panda is different from its namesake. While the giant panda is a powerful animal, the little red panda is much smaller and cute! This makes sense since the red panda only shares a name with the enormous bear.
However, its cuteness has made it very popular worldwide, and many people would like to know how to draw a red panda. If you are one of those people, this is your guide! Our step-by-step tutorial on drawing a red panda choice will have you create one of these cute animals in no time!
Also read: simple number coloring pages
How to Draw a Red Panda – Let’s Get Initiated!
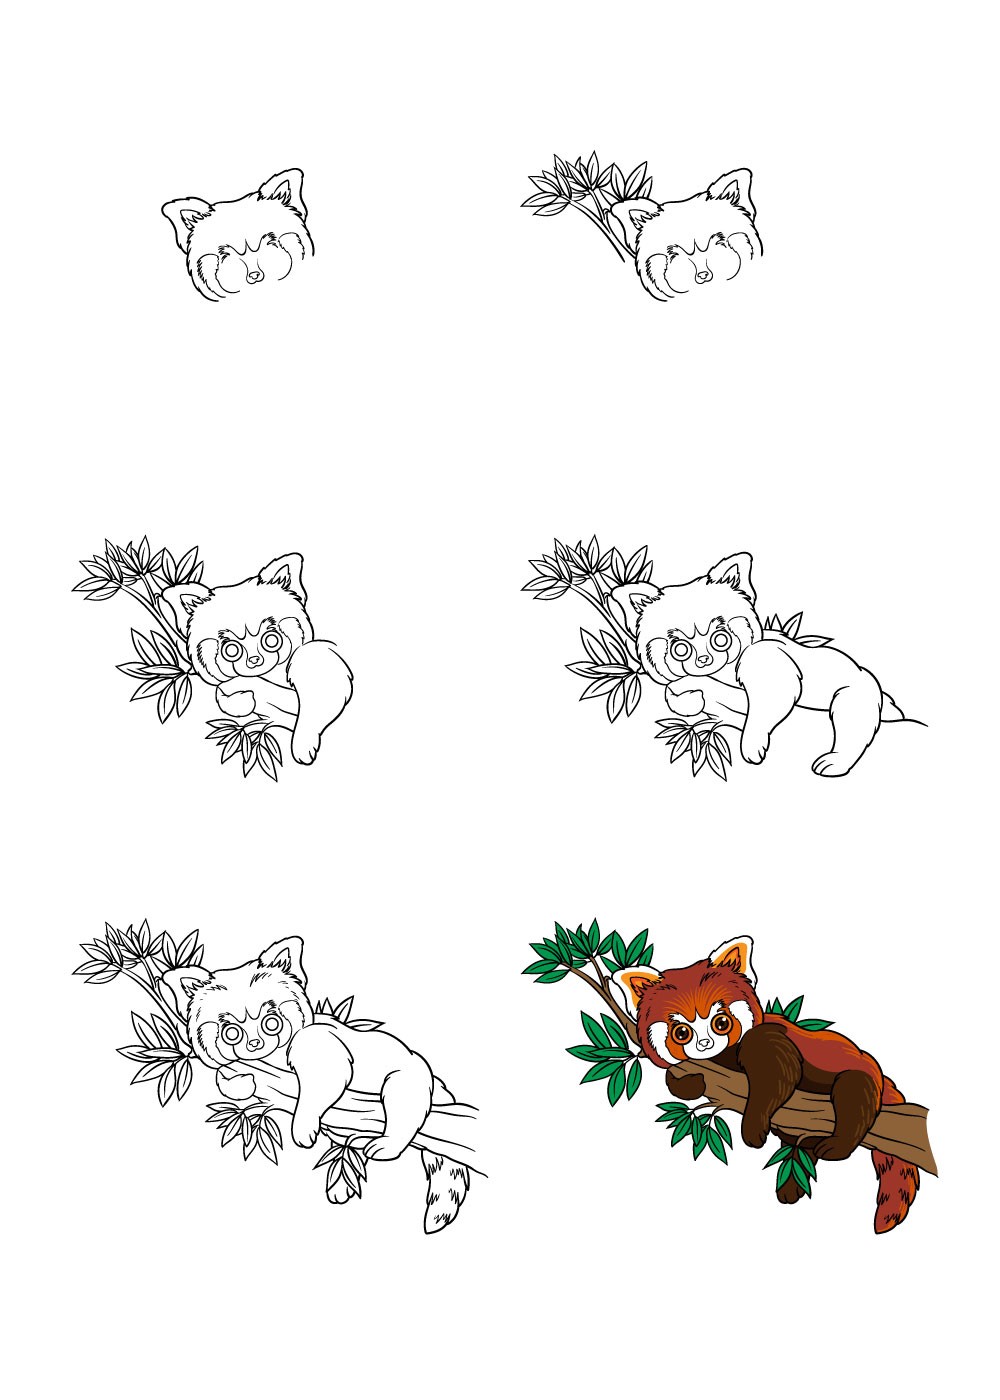
Step 1
To start this guide on how to draw a red panda, we’ll start with the cute little face! There are a lot of little details on this face, and it might look complicated, but if you take it easy, you shouldn’t have any problems!
You can use a pencil to draw some basic shapes. You could draw an oval for the lead and then use some little triangles for the ears. Then you can add the finer details on top of this pencil using your pen to make it look more like our reference image. If you follow the image closely and take time, you can do it!
Step 2
Now that you have the design of your red panda’s head drawn, we can add a few better aspects in this second step. First, you can draw some thin branches with clusters of thin leaves at the end.
The red panda will be hanging from some bamboo stems in this photo, which you chose to have drawn in this step. Then, before going any further, you can add some skin detail to the face using some small, jagged lines.
Step 3
In this manual step on how to draw a red panda, we’ll add the eyes and better of the branch it’s clinging to. For the eyes, you can draw two little circles with a round line inside them. Then, once you’ve drawn the eyes, you can create more of the branch by adding more leaves and the thickest part that it attaches to. Finally, you can draw a thick, hairy arm that hangs over the branch.
Step 4
Next, you will draw the body and your red panda picture. The body will be made up of a combination of straight and irregular lines to give it a furry look. Another leg will also hang from the branch, as shown in the reference image. Finally, you can draw better leaves from the red panda’s rear.
Step 5
Before adding some colour to your image, you can add the final details and elements in this step of our how-to-draw a red panda guide. You can first draw the bottom of the branch you are lying on and add more. Protruding leaves. You can then draw a big bushy tail that hangs down the panda’s back. That will take respect for all the details and parts of this guide! Before moving on to the final step, you can take some time to add your touches, details, and elements. A great addition would be to create an excellent background for this image to show where this red panda is relaxing. You could even draw more animals in the background. You could add a giant panda to show the contrast between the appearance of these two pandas! What other fun facts or background elements can you believe to add?
Step 6
Now that you’ve finished your red panda drawing, you can add some beautiful colours! As the name suggests, red pandas include a lot of red colouration, and we’ve incorporated that element into our reference image. Like red, we also use some browns and oranges for some variation. For the branch, we used darker browns and a lovely bright green for the leaves. However, this is just one way to colour this image!
Even if you keep the colours more realistic like our image, you can incorporate more colours you like by coloring the background elements and details you’ve added. You can also get fantastic colour variation by choosing the art mediums you will use. You can change it by including acrylic paints or coloured pens for lively colours. On the other hand, watercolour and coloured pencils would give the image a more subdued and beautiful appearance.